> ## Documentation Index
> Fetch the complete documentation index at: https://docs.flokitai.com/llms.txt
> Use this file to discover all available pages before exploring further.
# Connect from ChatGPT
> Add FloKit to ChatGPT as a Developer Mode connector, or call it from the OpenAI API with a token.
FloKit connects to OpenAI two ways: as a **connector in ChatGPT** (sign in with OAuth),
or as an **MCP tool from the OpenAI API** (Responses API or Agents SDK) with an access
token. Same read-only server, same tools.
`https://api.dashboard.flokitai.com/mcp`
## Option A — ChatGPT Developer Mode connector
Custom MCP connectors live under **Developer Mode**, available on ChatGPT Plus, Pro,
Business, and Enterprise. Enable it in **Settings → Connectors → Advanced → Developer
mode**.
In **Settings → Connectors**, choose **New connector** (Developer Mode). Name it
**FloKit** and paste the server URL, with authentication set to **OAuth**.
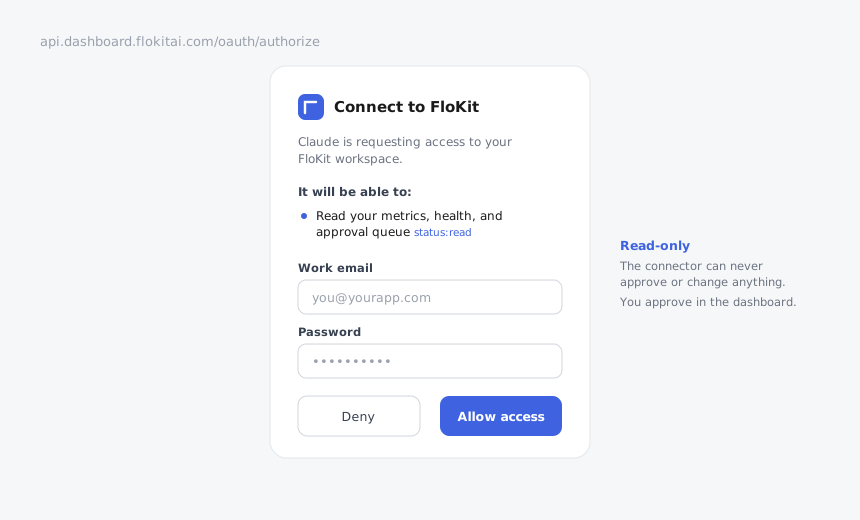
 ChatGPT opens the FloKit consent screen. Sign in with your FloKit work email and click
**Allow access** — the screen confirms read-only access.
ChatGPT opens the FloKit consent screen. Sign in with your FloKit work email and click
**Allow access** — the screen confirms read-only access.
 Start a chat with the FloKit connector enabled and try:
```text theme={null}
What's waiting for my approval, and what's my MRR this month?
```
## Option B — OpenAI API (Responses / Agents)
Point the OpenAI **Responses API** MCP tool at FloKit and pass your access token as the
`authorization` value — no browser sign-in.
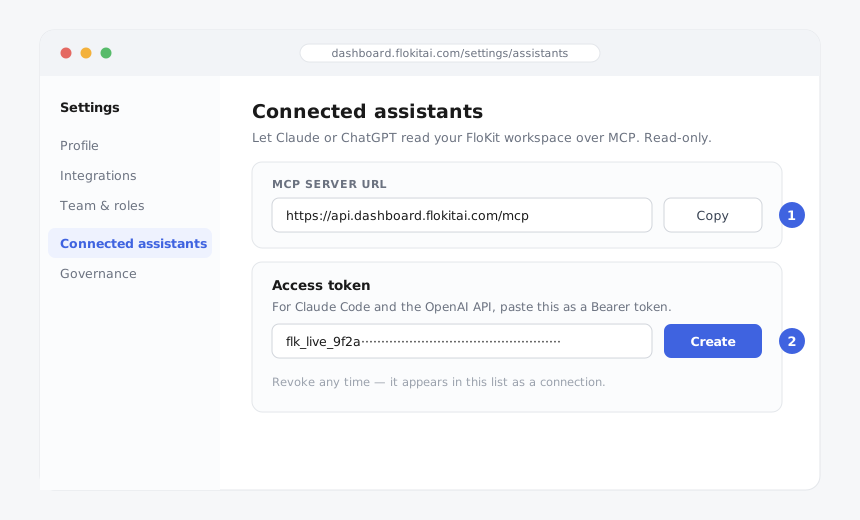
In the dashboard, **Settings → Connected assistants → Create**. Copy the token (starts
with `flk_live_`).
Start a chat with the FloKit connector enabled and try:
```text theme={null}
What's waiting for my approval, and what's my MRR this month?
```
## Option B — OpenAI API (Responses / Agents)
Point the OpenAI **Responses API** MCP tool at FloKit and pass your access token as the
`authorization` value — no browser sign-in.
In the dashboard, **Settings → Connected assistants → Create**. Copy the token (starts
with `flk_live_`).
 ```python Python theme={null}
from openai import OpenAI
client = OpenAI()
resp = client.responses.create(
model="gpt-5", # any model that supports MCP tools
tools=[{
"type": "mcp",
"server_label": "flokit",
"server_url": "https://api.dashboard.flokitai.com/mcp",
"authorization": "flk_live_your_token_here",
"require_approval": "never", # all FloKit tools are read-only
}],
input="What's going on with my app, and is anything waiting on my approval?",
)
print(resp.output_text)
```
```typescript TypeScript theme={null}
import OpenAI from "openai";
const client = new OpenAI();
const resp = await client.responses.create({
model: "gpt-5", // any model that supports MCP tools
tools: [{
type: "mcp",
server_label: "flokit",
server_url: "https://api.dashboard.flokitai.com/mcp",
authorization: "flk_live_your_token_here",
require_approval: "never", // all FloKit tools are read-only
}],
input: "What's going on with my app, and is anything waiting on my approval?",
});
console.log(resp.output_text);
```
Because every FloKit tool is read-only, `require_approval: "never"` is safe — the model
can't trigger a side effect. Keep the token server-side; never ship it to a browser or
mobile client.
## Troubleshooting
The token was revoked or expired. Mint a fresh one in **Settings → Connected
assistants**.
Make sure your prompt asks for something FloKit knows — status, metrics, or approvals.
Vague prompts may not trigger a tool call; try one of the [example prompts](/assistant/overview#example-prompts).
```python Python theme={null}
from openai import OpenAI
client = OpenAI()
resp = client.responses.create(
model="gpt-5", # any model that supports MCP tools
tools=[{
"type": "mcp",
"server_label": "flokit",
"server_url": "https://api.dashboard.flokitai.com/mcp",
"authorization": "flk_live_your_token_here",
"require_approval": "never", # all FloKit tools are read-only
}],
input="What's going on with my app, and is anything waiting on my approval?",
)
print(resp.output_text)
```
```typescript TypeScript theme={null}
import OpenAI from "openai";
const client = new OpenAI();
const resp = await client.responses.create({
model: "gpt-5", // any model that supports MCP tools
tools: [{
type: "mcp",
server_label: "flokit",
server_url: "https://api.dashboard.flokitai.com/mcp",
authorization: "flk_live_your_token_here",
require_approval: "never", // all FloKit tools are read-only
}],
input: "What's going on with my app, and is anything waiting on my approval?",
});
console.log(resp.output_text);
```
Because every FloKit tool is read-only, `require_approval: "never"` is safe — the model
can't trigger a side effect. Keep the token server-side; never ship it to a browser or
mobile client.
## Troubleshooting
The token was revoked or expired. Mint a fresh one in **Settings → Connected
assistants**.
Make sure your prompt asks for something FloKit knows — status, metrics, or approvals.
Vague prompts may not trigger a tool call; try one of the [example prompts](/assistant/overview#example-prompts).